> ## Documentation Index
> Fetch the complete documentation index at: https://docs.magic.link/llms.txt
> Use this file to discover all available pages before exploring further.
# Embedded Wallet Integration
> Add Embedded Wallet to a new or existing Next.js app
Integrating Magic into a new or existing app is as simple as installing the SDK, initializing Magic with your Magic Publishable API Key and chosen blockchain, authenticating your users with `magic.wallet.connectWithUI()` and other common smart contract interactions like sending a transaction and checking a user's balance. The sections below go through each of these steps one at a time.
If you want to jump straight into the code, check out this [GitHub Repository](https://github.com/magiclabs/example-next-quickstart).
## Install the SDK
Navigate to your project directory and install the Magic SDK as a project dependency.
```bash NPM icon="npm" theme={null}
npm install magic-sdk ethers
```
```bash Yarn icon="yarn" theme={null}
yarn add magic-sdk ethers
```
## Get your Magic Publishable API Key
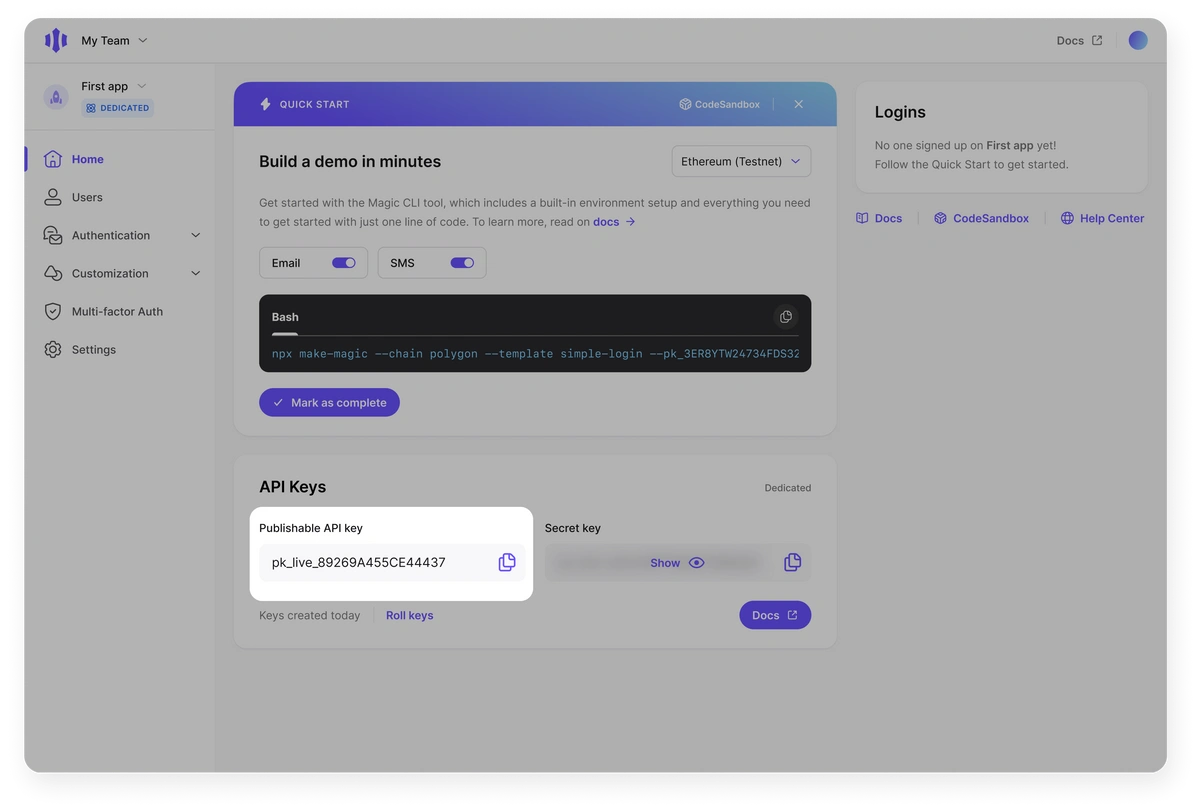
Grab your Magic **Publishable** API Key from your [Magic Dashboard](https://dashboard.magic.link). If you haven't already, you'll need to sign up for a free developer account.
 ## Initialize Magic
To get started, initialize an instance of Magic with your Publishable API Key and your choice of blockchain. Then initialize your chosen blockchain library, like Ethers.js, with the RPC provider in a separate file.
This guide uses Ethers v6 APIs such as `BrowserProvider`, `parseEther`, and `formatEther`.
Here's how you would initialize the Magic instance.
```typescript TypeScript icon="square-js" theme={null}
const magic = new Magic(process.env.NEXT_PUBLIC_MAGIC_API_KEY, {
network: {
rpcUrl: "https://rpc2.sepolia.org/",
chainId: 11155111,
},
})
```
The suggested approach for the Magic instance is to create a hook so Magic can be made available and used across the whole application like the one below.
```typescript TypeScript icon="square-js" theme={null}
import { Magic as MagicBase } from 'magic-sdk';
import { ReactNode, createContext, useContext, useEffect, useMemo, useState } from 'react';
export type Magic = MagicBase;
type MagicContextType = {
magic: Magic | null;
};
const MagicContext = createContext({
magic: null,
});
export const useMagic = () => useContext(MagicContext);
const MagicProvider = ({ children }: { children: ReactNode }) => {
const [magic, setMagic] = useState(null);
useEffect(() => {
if (process.env.NEXT_PUBLIC_MAGIC_API_KEY) {
const magic = new MagicBase(process.env.NEXT_PUBLIC_MAGIC_API_KEY as string, {
network: {
rpcUrl: "https://rpc2.sepolia.org/",
chainId: 11155111,
},
});
setMagic(magic);
}
}, []);
const value = useMemo(() => {
return {
magic,
};
}, [magic]);
return {children};
};
export default MagicProvider;
```
When you want to use the Magic instance, import the hook and destructure the required properties from it, which in this case is the Magic instance itself.
```typescript TypeScript icon="square-js" theme={null}
const { magic } = useMagic();
```
In a separate file, create a hook to initialize your ethers provider instance.
```typescript TypeScript icon="square-js" theme={null}
import { BrowserProvider } from "ethers";
import { useEffect, useState } from "react";
import { useMagic } from "./MagicProvider";
const useEthersProvider = () => {
const { magic } = useMagic();
const [provider, setProvider] = useState(null);
useEffect(() => {
if (magic) {
setProvider(new BrowserProvider((magic as any).rpcProvider));
} else {
console.log("Magic is not initialized");
}
}, [magic]);
return provider;
};
export default useEthersProvider;
```
Now whenever you need to use the provider, import the hook into the file you need it in and call it within your component.
```typescript TypeScript icon="square-js" theme={null}
const provider = useEthersProvider();
```
The above code snippets initialize Magic and ethers with a public Sepolia Testnet URL. You can point the instance to a different chain by modifying the URL and Chain ID. Magic seamlessly supports over 30+ different blockchains.
## Authenticate your users
Authenticating your users is as easy as calling `magic.wallet.connectWithUI()`. This will display Magic's Login UI. Magic will handle authentication using Email OTP with no additional code needed from your app. You log your users out by calling `magic.user.logout()`.
In addition to the flow provided by the Login UI, you can customize a Dedicated Wallet to use a [variety of authentication options](/embedded-wallets/authentication/overview) like SMS login, OAuth through popular social login providers, and more.
## Display the authenticated user's wallet
Display the authenticated user's wallet with `magic.wallet.showUI()`. This will show the user's wallet using Magic's Widget UI.
## Get user address
To retrieve the public address of the authenticated user, call `magic.user.getInfo()` and access the address through the `wallets` object. As of SDK v30.0.0, wallet addresses are organized by blockchain under `metadata.wallets` rather than returned as a top-level `publicAddress` field.
```typescript TypeScript icon="square-js" theme={null}
const metadata = await magic?.user.getInfo();
const publicAddress = metadata.wallets.ethereum?.publicAddress;
```
If you are on **SDK v29.x or below**, the address is available directly as `metadata.publicAddress`. See the [`getInfo` SDK reference](/embedded-wallets/sdk/client-side/javascript#getinfo) for the full legacy response shape and migration details.
## Get user balance
To get the token balance of a user, import the ethers provider and call `getBalance` with the Magic user's public address. Given that the Magic instance is connected to the Sepolia network, calling `getBalance` will return the amount of Sepolia tokens the user has.
In this example, we use the provider created earlier.
```typescript TypeScript icon="square-js" theme={null}
import { formatEther } from "ethers";
const provider = useEthersProvider();
const balance = await provider.getBalance(publicAddress);
const balanceInEth = formatEther(balance);
```
## Interact with the network
Magic integrates with all popular blockchain libraries so that you don't have to change anything about how you interact with the blockchain. For example, if you're using Ethereum or other EVM chains, you can get the user's wallet address or sign and send transactions the same way you normally would using ethers.js.
Here is an example of sending a transaction:
```typescript TypeScript icon="square-js" theme={null}
import { parseEther } from "ethers";
const provider = useEthersProvider();
async function sendEth(amount: number, recipientAddress: string) {
if (!provider) {
throw new Error("Ethers provider is not initialized");
}
const signer = await provider.getSigner();
const tx = await signer.sendTransaction({
to: recipientAddress,
value: parseEther(amount.toString()),
gasLimit: 21000,
});
console.log("Transaction hash:", tx.hash);
const receipt = await tx.wait();
console.log("Transaction receipt:", receipt);
}
```
## Customize Your App
This application uses our Embedded Wallet. The Embedded Wallet meets the widest variety of needs while still being incredibly simple to implement. In addition to the baked-in [Login UI](/embedded-wallets/authentication/customization/login-ui), it has plenty of customization options, supports [social login](/embedded-wallets/authentication/login/oauth/oauth-implementation) through providers like GitHub and Discord, and more.
## Next Steps
We have a suite of resources to help developers and companies with a wide variety of use cases. Below are some ideas to get you started, but feel free to browse our documentation or reach out with specific questions.
* Take a look at this demo's [GitHub Repository](https://github.com/magiclabs/embedded-wallet-quickstart) or [CodeSandbox](https://codesandbox.io/s/magic-embedded-wallet-quickstart-7h8wj)
* Add support for OAuth social providers like [Google](/embedded-wallets/authentication/login/oauth/social-providers/google), [GitHub](/embedded-wallets/authentication/login/oauth/social-providers/github), and [Discord](/embedded-wallets/authentication/login/oauth/social-providers/discord)
* Add support for one or more of the [30+ blockchains accessible through Magic](/embedded-wallets/blockchains/overview)
* Use Magic across a [variety of platforms](/embedded-wallets/sdk/overview), including Web, iOS, Android, and more
* Learn more about [Magic's security framework](/home/security/product-security) and how it can make your applications more secure
* Read Magic's [Whitepaper](https://magic-whitepaper-key-based-authentication-system.s3.us-west-2.amazonaws.com/Magic+Whitepaper.pdf)
* View [Magic Guides](https://magic.link/guides) for comprehensive articles covering a wide range of use cases
## Initialize Magic
To get started, initialize an instance of Magic with your Publishable API Key and your choice of blockchain. Then initialize your chosen blockchain library, like Ethers.js, with the RPC provider in a separate file.
This guide uses Ethers v6 APIs such as `BrowserProvider`, `parseEther`, and `formatEther`.
Here's how you would initialize the Magic instance.
```typescript TypeScript icon="square-js" theme={null}
const magic = new Magic(process.env.NEXT_PUBLIC_MAGIC_API_KEY, {
network: {
rpcUrl: "https://rpc2.sepolia.org/",
chainId: 11155111,
},
})
```
The suggested approach for the Magic instance is to create a hook so Magic can be made available and used across the whole application like the one below.
```typescript TypeScript icon="square-js" theme={null}
import { Magic as MagicBase } from 'magic-sdk';
import { ReactNode, createContext, useContext, useEffect, useMemo, useState } from 'react';
export type Magic = MagicBase;
type MagicContextType = {
magic: Magic | null;
};
const MagicContext = createContext({
magic: null,
});
export const useMagic = () => useContext(MagicContext);
const MagicProvider = ({ children }: { children: ReactNode }) => {
const [magic, setMagic] = useState(null);
useEffect(() => {
if (process.env.NEXT_PUBLIC_MAGIC_API_KEY) {
const magic = new MagicBase(process.env.NEXT_PUBLIC_MAGIC_API_KEY as string, {
network: {
rpcUrl: "https://rpc2.sepolia.org/",
chainId: 11155111,
},
});
setMagic(magic);
}
}, []);
const value = useMemo(() => {
return {
magic,
};
}, [magic]);
return {children};
};
export default MagicProvider;
```
When you want to use the Magic instance, import the hook and destructure the required properties from it, which in this case is the Magic instance itself.
```typescript TypeScript icon="square-js" theme={null}
const { magic } = useMagic();
```
In a separate file, create a hook to initialize your ethers provider instance.
```typescript TypeScript icon="square-js" theme={null}
import { BrowserProvider } from "ethers";
import { useEffect, useState } from "react";
import { useMagic } from "./MagicProvider";
const useEthersProvider = () => {
const { magic } = useMagic();
const [provider, setProvider] = useState(null);
useEffect(() => {
if (magic) {
setProvider(new BrowserProvider((magic as any).rpcProvider));
} else {
console.log("Magic is not initialized");
}
}, [magic]);
return provider;
};
export default useEthersProvider;
```
Now whenever you need to use the provider, import the hook into the file you need it in and call it within your component.
```typescript TypeScript icon="square-js" theme={null}
const provider = useEthersProvider();
```
The above code snippets initialize Magic and ethers with a public Sepolia Testnet URL. You can point the instance to a different chain by modifying the URL and Chain ID. Magic seamlessly supports over 30+ different blockchains.
## Authenticate your users
Authenticating your users is as easy as calling `magic.wallet.connectWithUI()`. This will display Magic's Login UI. Magic will handle authentication using Email OTP with no additional code needed from your app. You log your users out by calling `magic.user.logout()`.
In addition to the flow provided by the Login UI, you can customize a Dedicated Wallet to use a [variety of authentication options](/embedded-wallets/authentication/overview) like SMS login, OAuth through popular social login providers, and more.
## Display the authenticated user's wallet
Display the authenticated user's wallet with `magic.wallet.showUI()`. This will show the user's wallet using Magic's Widget UI.
## Get user address
To retrieve the public address of the authenticated user, call `magic.user.getInfo()` and access the address through the `wallets` object. As of SDK v30.0.0, wallet addresses are organized by blockchain under `metadata.wallets` rather than returned as a top-level `publicAddress` field.
```typescript TypeScript icon="square-js" theme={null}
const metadata = await magic?.user.getInfo();
const publicAddress = metadata.wallets.ethereum?.publicAddress;
```
If you are on **SDK v29.x or below**, the address is available directly as `metadata.publicAddress`. See the [`getInfo` SDK reference](/embedded-wallets/sdk/client-side/javascript#getinfo) for the full legacy response shape and migration details.
## Get user balance
To get the token balance of a user, import the ethers provider and call `getBalance` with the Magic user's public address. Given that the Magic instance is connected to the Sepolia network, calling `getBalance` will return the amount of Sepolia tokens the user has.
In this example, we use the provider created earlier.
```typescript TypeScript icon="square-js" theme={null}
import { formatEther } from "ethers";
const provider = useEthersProvider();
const balance = await provider.getBalance(publicAddress);
const balanceInEth = formatEther(balance);
```
## Interact with the network
Magic integrates with all popular blockchain libraries so that you don't have to change anything about how you interact with the blockchain. For example, if you're using Ethereum or other EVM chains, you can get the user's wallet address or sign and send transactions the same way you normally would using ethers.js.
Here is an example of sending a transaction:
```typescript TypeScript icon="square-js" theme={null}
import { parseEther } from "ethers";
const provider = useEthersProvider();
async function sendEth(amount: number, recipientAddress: string) {
if (!provider) {
throw new Error("Ethers provider is not initialized");
}
const signer = await provider.getSigner();
const tx = await signer.sendTransaction({
to: recipientAddress,
value: parseEther(amount.toString()),
gasLimit: 21000,
});
console.log("Transaction hash:", tx.hash);
const receipt = await tx.wait();
console.log("Transaction receipt:", receipt);
}
```
## Customize Your App
This application uses our Embedded Wallet. The Embedded Wallet meets the widest variety of needs while still being incredibly simple to implement. In addition to the baked-in [Login UI](/embedded-wallets/authentication/customization/login-ui), it has plenty of customization options, supports [social login](/embedded-wallets/authentication/login/oauth/oauth-implementation) through providers like GitHub and Discord, and more.
## Next Steps
We have a suite of resources to help developers and companies with a wide variety of use cases. Below are some ideas to get you started, but feel free to browse our documentation or reach out with specific questions.
* Take a look at this demo's [GitHub Repository](https://github.com/magiclabs/embedded-wallet-quickstart) or [CodeSandbox](https://codesandbox.io/s/magic-embedded-wallet-quickstart-7h8wj)
* Add support for OAuth social providers like [Google](/embedded-wallets/authentication/login/oauth/social-providers/google), [GitHub](/embedded-wallets/authentication/login/oauth/social-providers/github), and [Discord](/embedded-wallets/authentication/login/oauth/social-providers/discord)
* Add support for one or more of the [30+ blockchains accessible through Magic](/embedded-wallets/blockchains/overview)
* Use Magic across a [variety of platforms](/embedded-wallets/sdk/overview), including Web, iOS, Android, and more
* Learn more about [Magic's security framework](/home/security/product-security) and how it can make your applications more secure
* Read Magic's [Whitepaper](https://magic-whitepaper-key-based-authentication-system.s3.us-west-2.amazonaws.com/Magic+Whitepaper.pdf)
* View [Magic Guides](https://magic.link/guides) for comprehensive articles covering a wide range of use cases