> ## Documentation Index
> Fetch the complete documentation index at: https://docs.magic.link/llms.txt
> Use this file to discover all available pages before exploring further.
# Embedded Wallet CLI
> The fastest way to get started with Embedded Wallet is to bootstrap your project using `make-magic`, an easy-to-use CLI tool that generates a fully working Next.js application with Magic built in.
## Run `make-magic`
To get started, use the following command in your preferred shell:
```bash Bash theme={null}
npx make-magic
```
The tool will guide you through setting up your project with a series of interactive prompts, starting with your project's name.
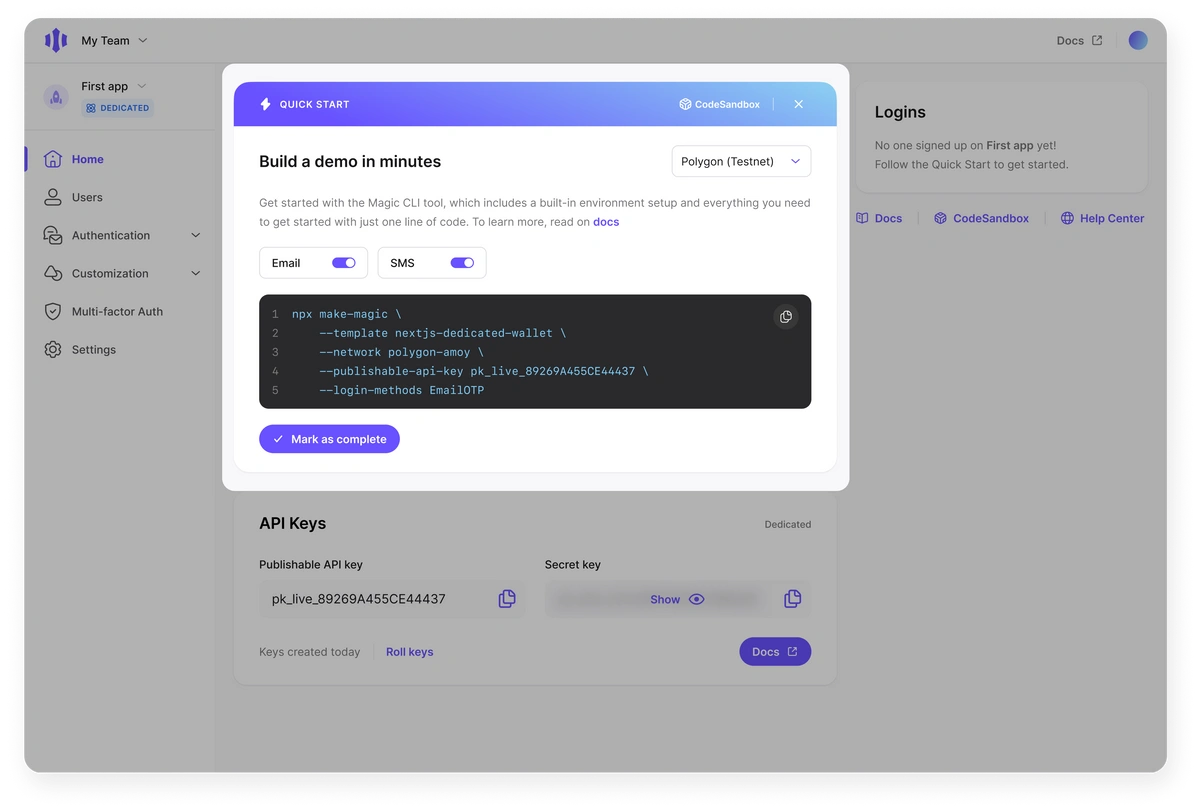
Alternatively, you can use the command from your [Magic Dashboard](https://dashboard.magic.link) after you create a new project. This will include pre-configured flags to skip most of the prompts.
 ## Configure Your Project
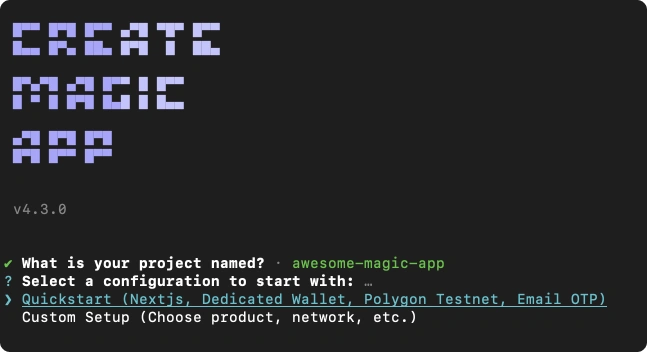
After entering a name, you’ll be asked to choose between two starting configurations:
1. Quickstart
2. Custom Setup
Select `Quickstart` for the simplest setup. This option bootstraps a Next.js project that connects to the Polygon Amoy test network.
## Configure Your Project
After entering a name, you’ll be asked to choose between two starting configurations:
1. Quickstart
2. Custom Setup
Select `Quickstart` for the simplest setup. This option bootstraps a Next.js project that connects to the Polygon Amoy test network.
 The Embedded Wallet is a white-label wallet you can use to tailor the wallet experience to your app and users. It [supports over 30 blockchains](/embedded-wallets/blockchains/overview), has a suite of enterprise features, and gives you broad control over the user authentication, onboarding, and wallet experience.
If you prefer to use another wallet, network, or authentication method, you can select `Custom Setup`. The CLI tool currently supports major chains such as Ethereum, Solana, and Flow. For additional blockchain support, you can get started with our [Integration Quickstart](/embedded-wallets/quickstart/overview) and add the relevant [blockchain extension](/embedded-wallets/blockchains/overview).
## Add Your API Key
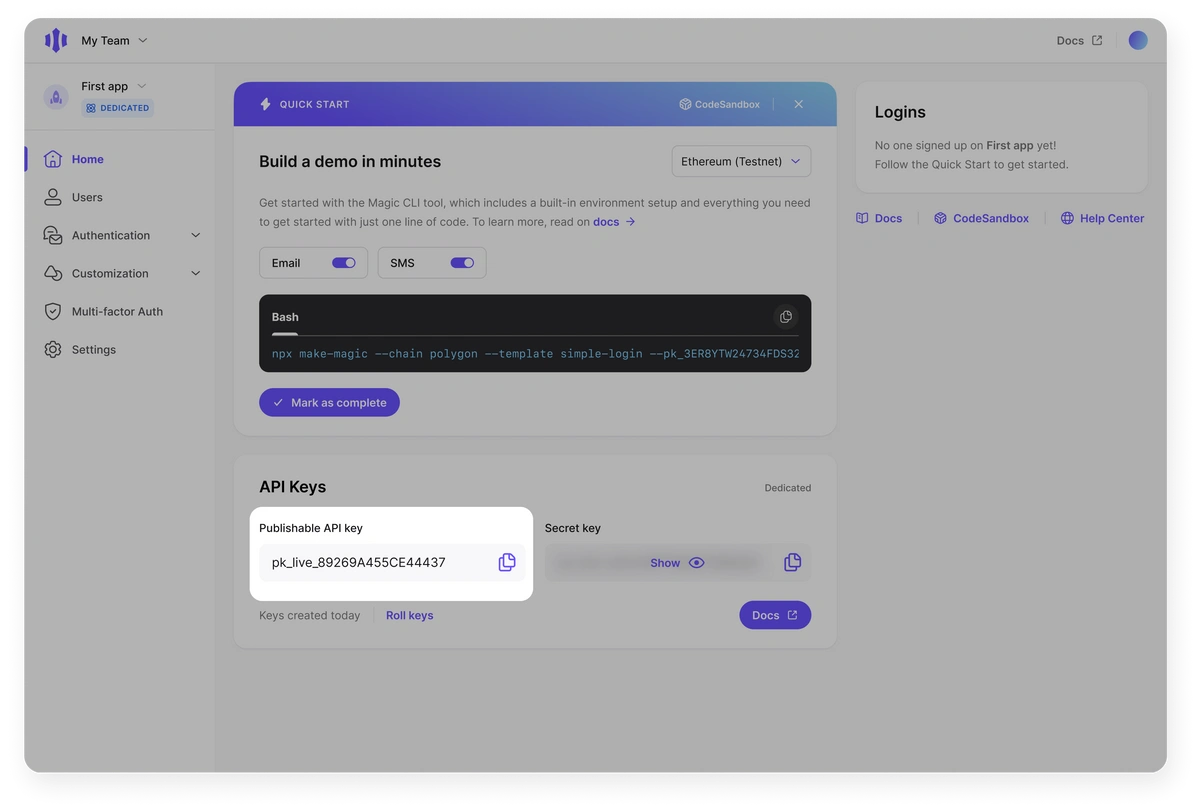
After finishing your initial configuration, you'll be prompted to enter your Magic **Publishable** API Key. You can find this in your [Magic Dashboard](https://dashboard.magic.link).
The Embedded Wallet is a white-label wallet you can use to tailor the wallet experience to your app and users. It [supports over 30 blockchains](/embedded-wallets/blockchains/overview), has a suite of enterprise features, and gives you broad control over the user authentication, onboarding, and wallet experience.
If you prefer to use another wallet, network, or authentication method, you can select `Custom Setup`. The CLI tool currently supports major chains such as Ethereum, Solana, and Flow. For additional blockchain support, you can get started with our [Integration Quickstart](/embedded-wallets/quickstart/overview) and add the relevant [blockchain extension](/embedded-wallets/blockchains/overview).
## Add Your API Key
After finishing your initial configuration, you'll be prompted to enter your Magic **Publishable** API Key. You can find this in your [Magic Dashboard](https://dashboard.magic.link).
 You can also leave this empty for now and add it to the project's `.env` file later.
## Run Your App
At this point, `make-magic` will create a new directory named after your project, download the code, install dependencies, and start running automatically on port 3000 (if it's not already in use). Next.js has built-in support for hot reloading, so most front-end code changes are applied instantly during development without the need for a server restart. You can update the UI, swap out the RPC URL in the `.env` file, and more, all without a restart. If you do need to restart the server, you can terminate the console process and execute `npm run dev`.
If you provided your Publishable API Key during the interactive prompts, you'll be able to log in and send a transaction right away! Otherwise, your project will show a landing page directing you to find and add your API Key as an environment variable.
You can also leave this empty for now and add it to the project's `.env` file later.
## Run Your App
At this point, `make-magic` will create a new directory named after your project, download the code, install dependencies, and start running automatically on port 3000 (if it's not already in use). Next.js has built-in support for hot reloading, so most front-end code changes are applied instantly during development without the need for a server restart. You can update the UI, swap out the RPC URL in the `.env` file, and more, all without a restart. If you do need to restart the server, you can terminate the console process and execute `npm run dev`.
If you provided your Publishable API Key during the interactive prompts, you'll be able to log in and send a transaction right away! Otherwise, your project will show a landing page directing you to find and add your API Key as an environment variable.
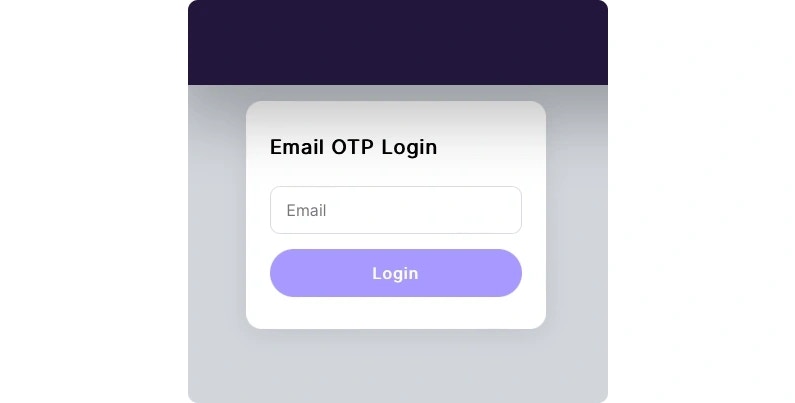 The login options available depend on your project's configuration. The `Quickstart`
option defaults to Email OTP. See the Embedded Wallet's documentation for the [full
list of available authentication options](/embedded-wallets/authentication/overview).
## Usage
Once a user is logged in, the Quickstart app shows a dashboard with 4 cards:
* `UserInfoCard.tsx` - Shows the network you're connected to, your address, and your token balance.
* `SendTransactionCard.tsx` - Lets you send native tokens to another address
* `WalletMethodsCard.tsx` - Shows and lets you test the various user methods available to you
* `SmartContract.tsx` - Input element with a button that is connected to a function that triggers a smart contract interaction. It allows you to update the stored integer in a basic storage contract. **Only available on EVM testnet templates**.
The login options available depend on your project's configuration. The `Quickstart`
option defaults to Email OTP. See the Embedded Wallet's documentation for the [full
list of available authentication options](/embedded-wallets/authentication/overview).
## Usage
Once a user is logged in, the Quickstart app shows a dashboard with 4 cards:
* `UserInfoCard.tsx` - Shows the network you're connected to, your address, and your token balance.
* `SendTransactionCard.tsx` - Lets you send native tokens to another address
* `WalletMethodsCard.tsx` - Shows and lets you test the various user methods available to you
* `SmartContract.tsx` - Input element with a button that is connected to a function that triggers a smart contract interaction. It allows you to update the stored integer in a basic storage contract. **Only available on EVM testnet templates**.
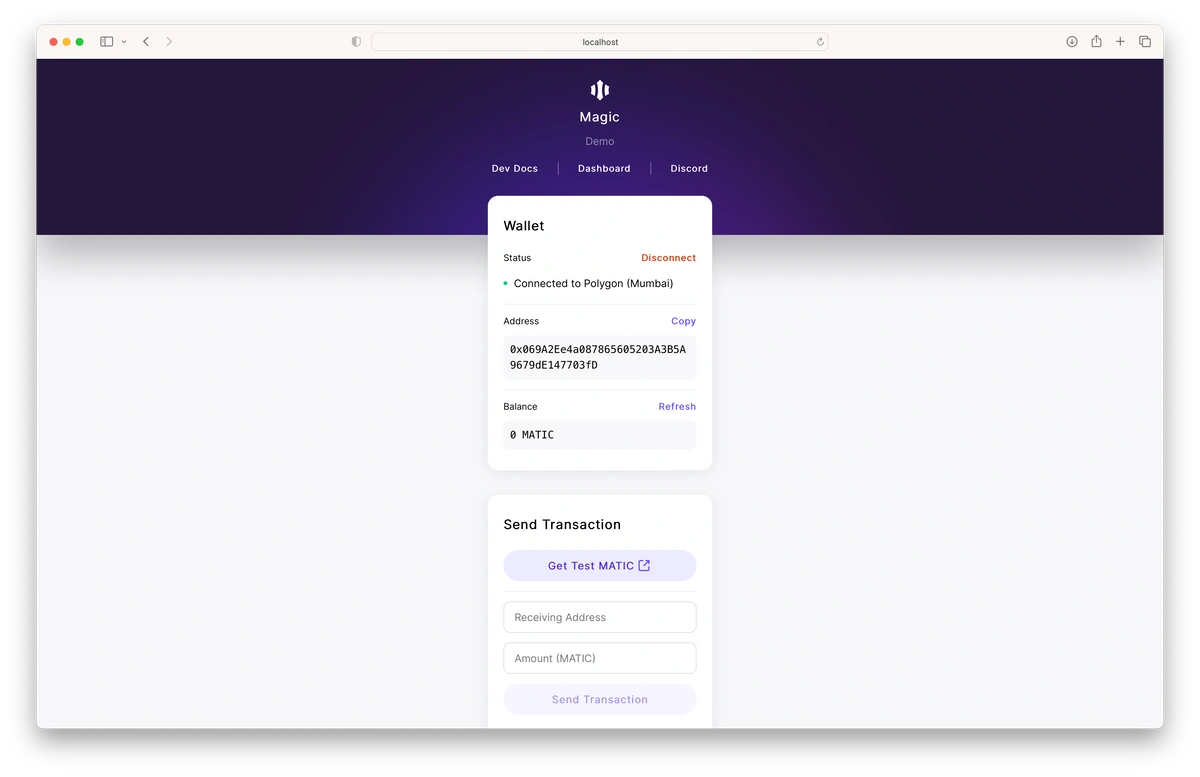 If you're on a test network, the Send Transaction card will have a button to get test tokens. Once you have test tokens, you can add a receiving address, an amount of tokens to send, and click Send Transaction to send tokens with your Magic wallet.
Congratulations! You've successfully bootstrapped a full application and sent your first transaction.
### Customize Your App
To customize the app, you can modify any of the code and restructure the project according to your needs. Magic-related components are organized in the updated file structure for better clarity and maintenance.
Here are some key directories and files you might want to work with:
* `src/components/magic/`: Contains all Magic-related logic, including authentication providers, wallet methods, login/logout functionality, and action cards such as `SendTransaction`. This directory centralizes components that interact with Magic, making it easier to manage authentication and wallet operations.
* `src/components/ui/`: Houses reusable UI components like cards and dividers. This directory ensures that UI elements are consistently styled and easily maintainable across the application.
* `src/hooks/`: Provides custom hooks for managing Magic and ethers provider instances, such as `useMagic` and `useEthersProvider`. These hooks make Magic and provider access globally available, facilitating their use throughout your components.
* `src/utils/`: Contains utility functions used throughout the app, including network configuration, smart contract interactions, type definitions, and more.
**Note**: The configuration for the Solana and Flow templates may vary from the EVM examples.
You can swap out the RPC URL in the `.env` file under the `NEXT_PUBLIC_BLOCKCHAIN_NETWORK` variable. Replace the value of that variable with one of the following:
* `polygon-amoy`
* `polygon`
* `ethereum-sepolia`
* `ethereum`
* `etherlink-testnet`
* `zksync`
* `zksync-sepolia`
To update any of the styling go to `src/styles/globals.css`.
This application uses our Embedded Wallet. The Embedded Wallet meets the widest variety of needs while still being incredibly simple to implement. In addition to the baked in [Login UI](/embedded-wallets/authentication/customization/login-ui), it has plenty of customization options, supports [social login](/embedded-wallets/authentication/login/oauth/oauth-implementation) through providers like GitHub and Discord, and more.
### Wallet Information
Once you have successfully logged in, the first card on your dashboard will display your Magic wallet details. This card provides a comprehensive overview of your connected wallet, including the network you are connected to, your wallet address, and your token balance. Additionally, there is a disconnect button that allows you to disconnect your wallet from the app.
### Send Your First Transaction
If you're on a test network, the Send Transaction card will have a button to get test tokens. Once you have test tokens, you can add a receiving address, an amount of tokens to send, and click Send Transaction to send tokens with your Magic wallet.
Congratulations! You've successfully sent your first transaction using Magic.
### Wallet Methods
This card offers various user methods that provide actions for managing user authentication and wallet operations, including:
* **Update Email**: Allows users to update their registered email address. This feature is particularly useful for users who logged in using the EMAIL method.
* **Get ID Token**: Retrieves the user's ID token. ID tokens are essential for verifying the user's identity and can be used for authentication purposes.
* **Get Metadata**: Fetches and displays metadata related to the user's Magic wallet. Metadata can include details like the public address, email (if available), and other relevant user information.
* **Disconnect**: Provides an option for users to disconnect their wallet from the application. This is useful for logging out securely or switching to a different account.
### Smart contracts
If you generate an app connected to EVM testnets, a component will be displayed that allows users to update the value in a basic storage smart contract. This serves as an illustration of how to connect Magic to a smart contract. The functionality is available as long as the user is connected to either Ethereum Sepolia, Polygon Amoy, or zkSync Sepolia.
## Next Steps
We have a suite of resources to help developers and companies with a wide variety of use cases. Below are some ideas to get you started, but feel free to browse our documentation or reach out with specific questions.
* Integrate Magic into your existing app by following the [Integration Quickstart](/embedded-wallets/quickstart/integration)
* Add support for OAuth social providers like [Google](/embedded-wallets/authentication/login/oauth/social-providers/google), [GitHub](/embedded-wallets/authentication/login/oauth/social-providers/github), and [Discord](/embedded-wallets/authentication/login/oauth/social-providers/discord)
* Add support for one or more of the [30+ blockchains accessible through Magic](/embedded-wallets/blockchains/overview)
* Use Magic across a [variety of platforms](/embedded-wallets/sdk/overview), including Web, iOS, Android, and more
* Learn more about [Magic's security framework](/home/security/product-security) and how it can make your applications more secure
* Read Magic's [Whitepaper](https://magic-whitepaper-key-based-authentication-system.s3.us-west-2.amazonaws.com/Magic+Whitepaper.pdf)
* View [Magic Guides](https://magic.link/guides) for comprehensive articles covering a wide range of use cases
If you're on a test network, the Send Transaction card will have a button to get test tokens. Once you have test tokens, you can add a receiving address, an amount of tokens to send, and click Send Transaction to send tokens with your Magic wallet.
Congratulations! You've successfully bootstrapped a full application and sent your first transaction.
### Customize Your App
To customize the app, you can modify any of the code and restructure the project according to your needs. Magic-related components are organized in the updated file structure for better clarity and maintenance.
Here are some key directories and files you might want to work with:
* `src/components/magic/`: Contains all Magic-related logic, including authentication providers, wallet methods, login/logout functionality, and action cards such as `SendTransaction`. This directory centralizes components that interact with Magic, making it easier to manage authentication and wallet operations.
* `src/components/ui/`: Houses reusable UI components like cards and dividers. This directory ensures that UI elements are consistently styled and easily maintainable across the application.
* `src/hooks/`: Provides custom hooks for managing Magic and ethers provider instances, such as `useMagic` and `useEthersProvider`. These hooks make Magic and provider access globally available, facilitating their use throughout your components.
* `src/utils/`: Contains utility functions used throughout the app, including network configuration, smart contract interactions, type definitions, and more.
**Note**: The configuration for the Solana and Flow templates may vary from the EVM examples.
You can swap out the RPC URL in the `.env` file under the `NEXT_PUBLIC_BLOCKCHAIN_NETWORK` variable. Replace the value of that variable with one of the following:
* `polygon-amoy`
* `polygon`
* `ethereum-sepolia`
* `ethereum`
* `etherlink-testnet`
* `zksync`
* `zksync-sepolia`
To update any of the styling go to `src/styles/globals.css`.
This application uses our Embedded Wallet. The Embedded Wallet meets the widest variety of needs while still being incredibly simple to implement. In addition to the baked in [Login UI](/embedded-wallets/authentication/customization/login-ui), it has plenty of customization options, supports [social login](/embedded-wallets/authentication/login/oauth/oauth-implementation) through providers like GitHub and Discord, and more.
### Wallet Information
Once you have successfully logged in, the first card on your dashboard will display your Magic wallet details. This card provides a comprehensive overview of your connected wallet, including the network you are connected to, your wallet address, and your token balance. Additionally, there is a disconnect button that allows you to disconnect your wallet from the app.
### Send Your First Transaction
If you're on a test network, the Send Transaction card will have a button to get test tokens. Once you have test tokens, you can add a receiving address, an amount of tokens to send, and click Send Transaction to send tokens with your Magic wallet.
Congratulations! You've successfully sent your first transaction using Magic.
### Wallet Methods
This card offers various user methods that provide actions for managing user authentication and wallet operations, including:
* **Update Email**: Allows users to update their registered email address. This feature is particularly useful for users who logged in using the EMAIL method.
* **Get ID Token**: Retrieves the user's ID token. ID tokens are essential for verifying the user's identity and can be used for authentication purposes.
* **Get Metadata**: Fetches and displays metadata related to the user's Magic wallet. Metadata can include details like the public address, email (if available), and other relevant user information.
* **Disconnect**: Provides an option for users to disconnect their wallet from the application. This is useful for logging out securely or switching to a different account.
### Smart contracts
If you generate an app connected to EVM testnets, a component will be displayed that allows users to update the value in a basic storage smart contract. This serves as an illustration of how to connect Magic to a smart contract. The functionality is available as long as the user is connected to either Ethereum Sepolia, Polygon Amoy, or zkSync Sepolia.
## Next Steps
We have a suite of resources to help developers and companies with a wide variety of use cases. Below are some ideas to get you started, but feel free to browse our documentation or reach out with specific questions.
* Integrate Magic into your existing app by following the [Integration Quickstart](/embedded-wallets/quickstart/integration)
* Add support for OAuth social providers like [Google](/embedded-wallets/authentication/login/oauth/social-providers/google), [GitHub](/embedded-wallets/authentication/login/oauth/social-providers/github), and [Discord](/embedded-wallets/authentication/login/oauth/social-providers/discord)
* Add support for one or more of the [30+ blockchains accessible through Magic](/embedded-wallets/blockchains/overview)
* Use Magic across a [variety of platforms](/embedded-wallets/sdk/overview), including Web, iOS, Android, and more
* Learn more about [Magic's security framework](/home/security/product-security) and how it can make your applications more secure
* Read Magic's [Whitepaper](https://magic-whitepaper-key-based-authentication-system.s3.us-west-2.amazonaws.com/Magic+Whitepaper.pdf)
* View [Magic Guides](https://magic.link/guides) for comprehensive articles covering a wide range of use cases