> ## Documentation Index
> Fetch the complete documentation index at: https://docs.magic.link/llms.txt
> Use this file to discover all available pages before exploring further.
# Google Social Login with Magic
> You can allow your users to sign up & login into your web application with their Google account, via either the standard OAuth redirect flow or an inline Google One Tap prompt.
Prefer an inline sign-in prompt to a redirect? Jump to the [Google One Tap](#google-one-tap) section below. Both flows share the same setup steps and resolve to the same Magic user and wallet.
## Usage
If your users are encountering an "Access blocked: magic.link has not completed the Google verification process" error, please [read below](#verification-process).
### Prerequisites
* You will need a [Google Developer](https://console.developers.google.com/) account
* You will need to have the [Magic SDK installed](/embedded-wallets/sdk/overview) into your web app
* You will need to have the [Magic SDK - OAuth Extension](/embedded-wallets/authentication/login/oauth/oauth-implementation) installed into your web app
### Google Setup
After installing the OAuth extension, you can now enable Google Login for your Magic app:
1. Follow Google's instructions to [set up an OAuth 2.0 app](https://support.google.com/cloud/answer/6158849?hl=en)
2. Obtain the OAuth **Client ID** and **Client Secret** from your [Google Developer dashboard](https://console.developers.google.com/)
3. Go to your [Magic Dashboard](https://dashboard.magic.link/login)
4. Select the Magic app for which you'd like to enable Google Login, or create a new app
5. Navigate to **Social Login** from the sidebar
6. Click the toggle for **Google / Gmail**
7. Input the **Client ID** and **Client Secret** for your OAuth app
8. Add your **Redirect URI** to your Google Dashboard's OAuth app configuration:
If you're using `loginWithRedirect`, add the **Redirect URI** you are passing as the **redirectURI** argument:
```javascript JavaScript icon="square-js" theme={null}
await magic.oauth2.loginWithRedirect({
provider: 'google',
redirectURI: 'https://your-app.com/your/oauth/callback', // whitelist this with Google
});
```
Choose "Magic Login Widget" in your Magic Dashboard's Google OAuth settings and copy the **Redirect URI** field from your Magic Dashboard. Add this Redirect URI to your Google Dashboard's OAuth app configuration:
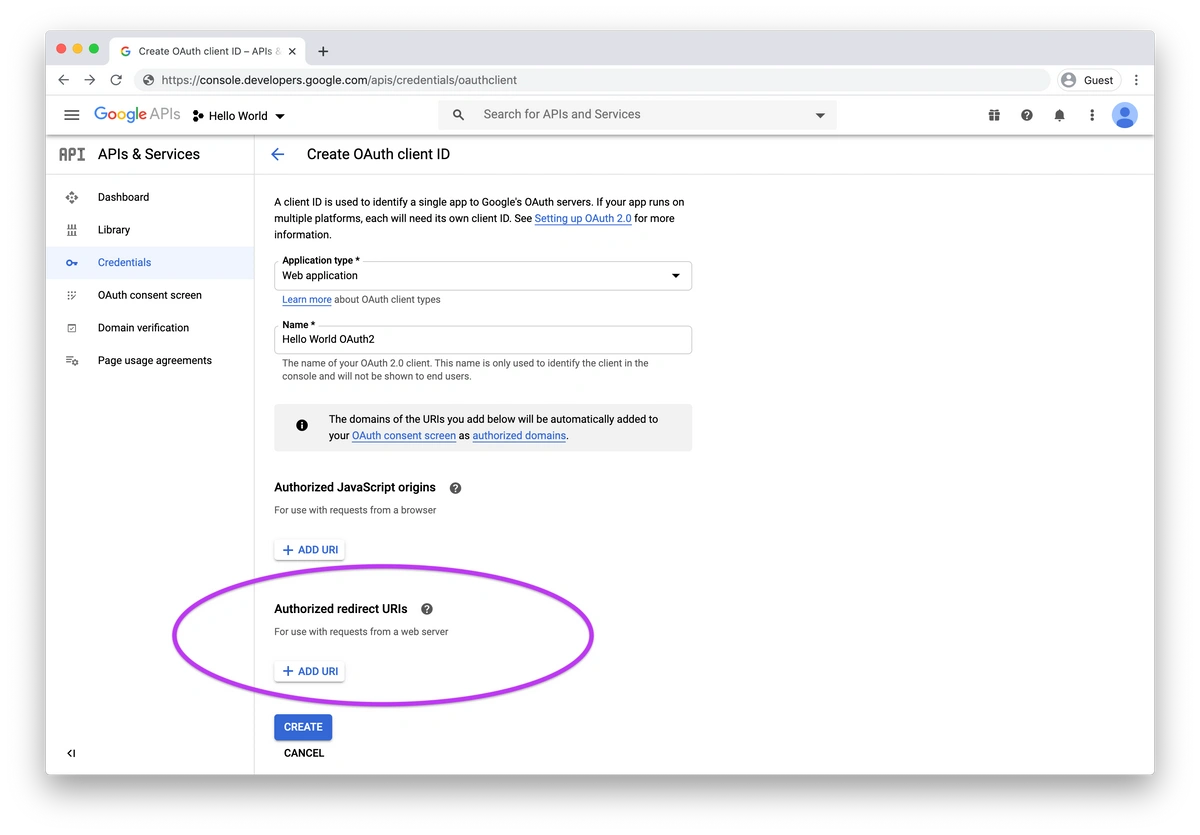 9. In Magic Dashboard, click **"Save"**
10. Click "**Test Connection**" to give your new Google OAuth flow a try!
## OAuth Redirect
The standard Google sign-in flow redirects users to Google's OAuth screen and back to a callback URL on your site.
```javascript JavaScript icon="square-js" theme={null}
await magic.oauth2.loginWithRedirect({
provider: 'google',
redirectURI: 'https://your-app.com/your/oauth/callback',
});
```
For full usage including handling the redirect result and accessing the DID token, see the [OAuth Implementation](/embedded-wallets/authentication/login/oauth/oauth-implementation) guide.
## Google One Tap
Google One Tap shows an inline sign-in prompt embedded on your page, so users never leave your app during sign-in. You integrate [Google Identity Services (GSI)](https://developers.google.com/identity/gsi/web/guides/overview) on your site, receive a Google-issued ID token (JWT), and pass it to Magic via `loginWithGoogleIdToken`. Magic verifies the token and returns a session — and because identity resolution runs through the same Google OAuth provider as the redirect flow, **One Tap users resolve to the same Magic user and wallet as redirect-flow users** automatically.
The Google Client ID you use for One Tap **must match** the Client ID you entered in your Magic Dashboard's [Google Social Login configuration](#google-setup) above. If the Client IDs don't match, the request is rejected with a `400`.
This requires `@magic-ext/oauth2` `v15.8.0` or higher.
### Implementation
Magic does not bundle Google Identity Services — your app loads the GSI client library and obtains the ID token, then passes it to Magic for verification. Save the following as `gsi.js` (or wherever you keep client utilities). It loads the GSI script the first time it's called, shows the One Tap prompt, and returns the resulting Google ID token as a Promise.
```javascript JavaScript icon="square-js" theme={null}
const GSI_SCRIPT_SRC = 'https://accounts.google.com/gsi/client';
let gsiPromise = null;
function loadGsi() {
if (gsiPromise) return gsiPromise;
gsiPromise = new Promise((resolve, reject) => {
if (window.google?.accounts?.id) {
resolve(window.google.accounts.id);
return;
}
const script = document.createElement('script');
script.src = GSI_SCRIPT_SRC;
script.async = true;
script.defer = true;
script.onload = () => {
if (window.google?.accounts?.id) resolve(window.google.accounts.id);
else reject(new Error('GSI script loaded but window.google.accounts.id is unavailable.'));
};
script.onerror = () => reject(new Error(`Failed to load GSI script: ${GSI_SCRIPT_SRC}`));
document.head.appendChild(script);
});
return gsiPromise;
}
/**
* Loads GSI, shows the One Tap prompt, and resolves with the resulting Google ID token (JWT).
*/
export async function promptGoogleOneTap({ clientId }) {
const accountsId = await loadGsi();
return new Promise((resolve, reject) => {
accountsId.initialize({
client_id: clientId,
callback: (response) => {
if (!response?.credential) {
reject(new Error('Google One Tap returned no credential.'));
return;
}
resolve(response.credential);
},
});
accountsId.prompt((notification) => {
if (notification.isNotDisplayed?.()) {
reject(new Error(`Google One Tap not displayed: ${notification.getNotDisplayedReason?.()}`));
}
});
});
}
```
You'll also need to add your app's origin (for example `https://your-app.com` and `http://localhost:3000` for local development) to **Authorized JavaScript origins** on your OAuth 2.0 Client ID in the [Google Cloud Console](https://console.developers.google.com/) — GSI requires it.
Refer to [Google's One Tap documentation](https://developers.google.com/identity/gsi/web/guides/display-google-one-tap) for advanced configuration (auto-select, FedCM, cooldowns, button rendering, etc.).
Call the helper to obtain the JWT, then pass it to `loginWithGoogleIdToken` along with the same Google Client ID. Magic verifies the token's signature, issuer, and audience against Google, then returns a DID token you can use with the [Admin SDK](/embedded-wallets/sdk/server-side/node#token-module) to verify the user on your backend.
```javascript JavaScript icon="square-js" theme={null}
import { Magic } from 'magic-sdk';
import { OAuthExtension } from '@magic-ext/oauth2';
import { promptGoogleOneTap } from './gsi';
const GOOGLE_CLIENT_ID = 'YOUR_GOOGLE_CLIENT_ID';
const magic = new Magic('YOUR_MAGIC_API_KEY', {
extensions: [new OAuthExtension()],
});
async function loginWithGoogle() {
const jwt = await promptGoogleOneTap({ clientId: GOOGLE_CLIENT_ID });
const didToken = await magic.oauth2.loginWithGoogleIdToken({
jwt,
googleClientId: GOOGLE_CLIENT_ID,
});
// Send didToken to your backend for verification
console.log(didToken);
}
```
### Method reference
```typescript theme={null}
interface LoginWithGoogleIdTokenConfiguration {
jwt: string; // Google-issued ID token (JWT) from the GSI callback
googleClientId: string; // Your Google OAuth Client ID
lifespan?: number; // Optional DID token lifespan in seconds
}
magic.oauth2.loginWithGoogleIdToken(
configuration: LoginWithGoogleIdTokenConfiguration
): Promise;
```
### Other Google Identity Services flows
The `loginWithGoogleIdToken` method accepts any Google-issued ID token, so it works with any [Google Identity Services](https://developers.google.com/identity/gsi/web) flow that returns an `id_token` credential:
* **One Tap prompt** — `google.accounts.id.prompt()` (shown above)
* **Sign in with Google button** — `google.accounts.id.renderButton(...)` for a customer-rendered button instead of the auto-prompt
Both return a credential via the same callback contract, so the Magic-side integration is identical — only the GSI trigger differs.
## Verification Process
If your users are encountering an `Access blocked: magic.link has not completed the Google verification process` error, you will need to navigate to your Google developer dashboard and change your app's "Publishing status" from "Testing" to "In production".
9. In Magic Dashboard, click **"Save"**
10. Click "**Test Connection**" to give your new Google OAuth flow a try!
## OAuth Redirect
The standard Google sign-in flow redirects users to Google's OAuth screen and back to a callback URL on your site.
```javascript JavaScript icon="square-js" theme={null}
await magic.oauth2.loginWithRedirect({
provider: 'google',
redirectURI: 'https://your-app.com/your/oauth/callback',
});
```
For full usage including handling the redirect result and accessing the DID token, see the [OAuth Implementation](/embedded-wallets/authentication/login/oauth/oauth-implementation) guide.
## Google One Tap
Google One Tap shows an inline sign-in prompt embedded on your page, so users never leave your app during sign-in. You integrate [Google Identity Services (GSI)](https://developers.google.com/identity/gsi/web/guides/overview) on your site, receive a Google-issued ID token (JWT), and pass it to Magic via `loginWithGoogleIdToken`. Magic verifies the token and returns a session — and because identity resolution runs through the same Google OAuth provider as the redirect flow, **One Tap users resolve to the same Magic user and wallet as redirect-flow users** automatically.
The Google Client ID you use for One Tap **must match** the Client ID you entered in your Magic Dashboard's [Google Social Login configuration](#google-setup) above. If the Client IDs don't match, the request is rejected with a `400`.
This requires `@magic-ext/oauth2` `v15.8.0` or higher.
### Implementation
Magic does not bundle Google Identity Services — your app loads the GSI client library and obtains the ID token, then passes it to Magic for verification. Save the following as `gsi.js` (or wherever you keep client utilities). It loads the GSI script the first time it's called, shows the One Tap prompt, and returns the resulting Google ID token as a Promise.
```javascript JavaScript icon="square-js" theme={null}
const GSI_SCRIPT_SRC = 'https://accounts.google.com/gsi/client';
let gsiPromise = null;
function loadGsi() {
if (gsiPromise) return gsiPromise;
gsiPromise = new Promise((resolve, reject) => {
if (window.google?.accounts?.id) {
resolve(window.google.accounts.id);
return;
}
const script = document.createElement('script');
script.src = GSI_SCRIPT_SRC;
script.async = true;
script.defer = true;
script.onload = () => {
if (window.google?.accounts?.id) resolve(window.google.accounts.id);
else reject(new Error('GSI script loaded but window.google.accounts.id is unavailable.'));
};
script.onerror = () => reject(new Error(`Failed to load GSI script: ${GSI_SCRIPT_SRC}`));
document.head.appendChild(script);
});
return gsiPromise;
}
/**
* Loads GSI, shows the One Tap prompt, and resolves with the resulting Google ID token (JWT).
*/
export async function promptGoogleOneTap({ clientId }) {
const accountsId = await loadGsi();
return new Promise((resolve, reject) => {
accountsId.initialize({
client_id: clientId,
callback: (response) => {
if (!response?.credential) {
reject(new Error('Google One Tap returned no credential.'));
return;
}
resolve(response.credential);
},
});
accountsId.prompt((notification) => {
if (notification.isNotDisplayed?.()) {
reject(new Error(`Google One Tap not displayed: ${notification.getNotDisplayedReason?.()}`));
}
});
});
}
```
You'll also need to add your app's origin (for example `https://your-app.com` and `http://localhost:3000` for local development) to **Authorized JavaScript origins** on your OAuth 2.0 Client ID in the [Google Cloud Console](https://console.developers.google.com/) — GSI requires it.
Refer to [Google's One Tap documentation](https://developers.google.com/identity/gsi/web/guides/display-google-one-tap) for advanced configuration (auto-select, FedCM, cooldowns, button rendering, etc.).
Call the helper to obtain the JWT, then pass it to `loginWithGoogleIdToken` along with the same Google Client ID. Magic verifies the token's signature, issuer, and audience against Google, then returns a DID token you can use with the [Admin SDK](/embedded-wallets/sdk/server-side/node#token-module) to verify the user on your backend.
```javascript JavaScript icon="square-js" theme={null}
import { Magic } from 'magic-sdk';
import { OAuthExtension } from '@magic-ext/oauth2';
import { promptGoogleOneTap } from './gsi';
const GOOGLE_CLIENT_ID = 'YOUR_GOOGLE_CLIENT_ID';
const magic = new Magic('YOUR_MAGIC_API_KEY', {
extensions: [new OAuthExtension()],
});
async function loginWithGoogle() {
const jwt = await promptGoogleOneTap({ clientId: GOOGLE_CLIENT_ID });
const didToken = await magic.oauth2.loginWithGoogleIdToken({
jwt,
googleClientId: GOOGLE_CLIENT_ID,
});
// Send didToken to your backend for verification
console.log(didToken);
}
```
### Method reference
```typescript theme={null}
interface LoginWithGoogleIdTokenConfiguration {
jwt: string; // Google-issued ID token (JWT) from the GSI callback
googleClientId: string; // Your Google OAuth Client ID
lifespan?: number; // Optional DID token lifespan in seconds
}
magic.oauth2.loginWithGoogleIdToken(
configuration: LoginWithGoogleIdTokenConfiguration
): Promise;
```
### Other Google Identity Services flows
The `loginWithGoogleIdToken` method accepts any Google-issued ID token, so it works with any [Google Identity Services](https://developers.google.com/identity/gsi/web) flow that returns an `id_token` credential:
* **One Tap prompt** — `google.accounts.id.prompt()` (shown above)
* **Sign in with Google button** — `google.accounts.id.renderButton(...)` for a customer-rendered button instead of the auto-prompt
Both return a credential via the same callback contract, so the Magic-side integration is identical — only the GSI trigger differs.
## Verification Process
If your users are encountering an `Access blocked: magic.link has not completed the Google verification process` error, you will need to navigate to your Google developer dashboard and change your app's "Publishing status" from "Testing" to "In production".
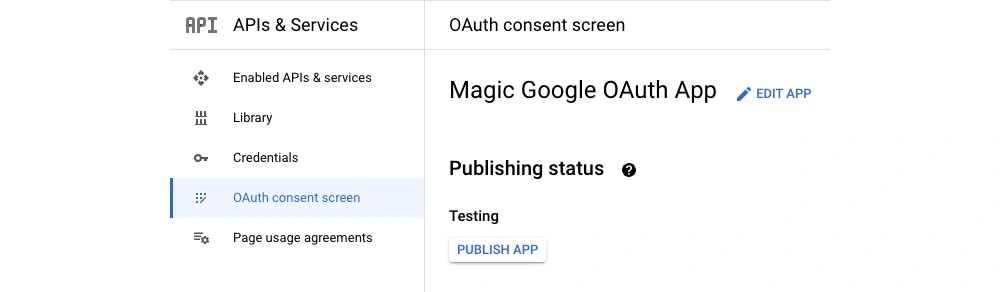 To do this, please follow these steps:
1. Go to your app within the Google developer dashboard and select "OAuth consent screen" on the nav menu.
2. Under "Publishing status", select "publish app".
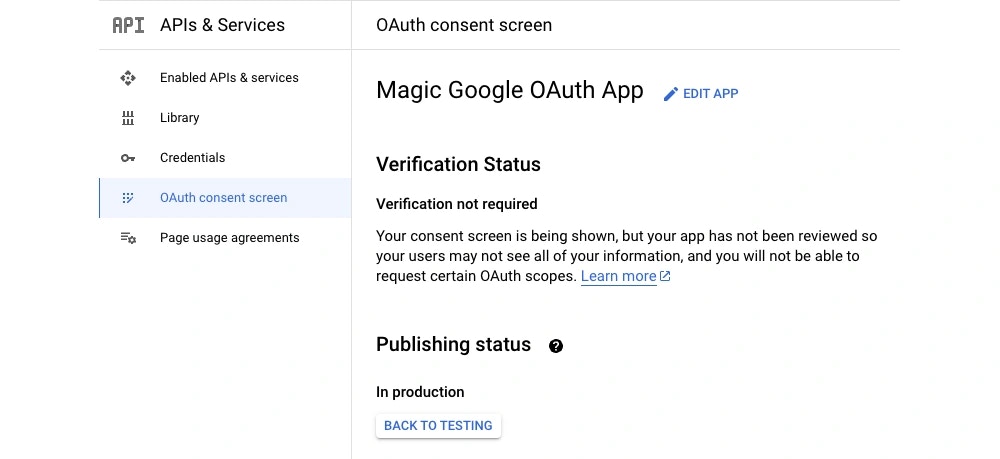
3. Once the status is set to "In production", you should no longer be encountering the error.
If your app meets certain criteria, you might be required to go through a verification process. To avoid this, we recommend removing any icons or logos you have added in the Google developer dashboard.
The full list of criteria that requires verification from Google is as follows:
* You want your application to display an icon or app name
* Your app requests authorization of any sensitive or restricted scopes
* The number of authorized domains for your apps [exceeds the domain count limit](https://support.google.com/cloud/answer/7650096) for a project
* There are changes to the OAuth consent screen after your app has been approved
To do this, please follow these steps:
1. Go to your app within the Google developer dashboard and select "OAuth consent screen" on the nav menu.
2. Under "Publishing status", select "publish app".
3. Once the status is set to "In production", you should no longer be encountering the error.
If your app meets certain criteria, you might be required to go through a verification process. To avoid this, we recommend removing any icons or logos you have added in the Google developer dashboard.
The full list of criteria that requires verification from Google is as follows:
* You want your application to display an icon or app name
* Your app requests authorization of any sensitive or restricted scopes
* The number of authorized domains for your apps [exceeds the domain count limit](https://support.google.com/cloud/answer/7650096) for a project
* There are changes to the OAuth consent screen after your app has been approved
 ## Gmail Linking
A user's email login and Google social login can automatically be linked so that logging in with either auth factor will resolve to a single wallet. This applies to both the OAuth Redirect and One Tap flows above.
Each login counts towards a unique monthly active wallet for billing purposes.
This is most useful when end users forget whether they signed up to your app using Google login or via email login. This prevents the user seeing 2 unique wallet addresses and confusion around which wallet holds their assets.
By default, this account linking is enabled in the dashboard when you enable Google Sign-In. This will ensure that users who log in with an email and Google social login using the same email address will resolve to the same wallet. Turning this feature off will prevent automatic linking for new users. It **will not unlink** existing users' social and email logins.
## Resources
* [Google Social Login Demo](https://magic-oauth-v2-dun.vercel.app)
* [Google Identity Services — One Tap](https://developers.google.com/identity/gsi/web/guides/display-google-one-tap)
* [Google Identity Services — Sign in with Google button](https://developers.google.com/identity/gsi/web/guides/display-button)
## Gmail Linking
A user's email login and Google social login can automatically be linked so that logging in with either auth factor will resolve to a single wallet. This applies to both the OAuth Redirect and One Tap flows above.
Each login counts towards a unique monthly active wallet for billing purposes.
This is most useful when end users forget whether they signed up to your app using Google login or via email login. This prevents the user seeing 2 unique wallet addresses and confusion around which wallet holds their assets.
By default, this account linking is enabled in the dashboard when you enable Google Sign-In. This will ensure that users who log in with an email and Google social login using the same email address will resolve to the same wallet. Turning this feature off will prevent automatic linking for new users. It **will not unlink** existing users' social and email logins.
## Resources
* [Google Social Login Demo](https://magic-oauth-v2-dun.vercel.app)
* [Google Identity Services — One Tap](https://developers.google.com/identity/gsi/web/guides/display-google-one-tap)
* [Google Identity Services — Sign in with Google button](https://developers.google.com/identity/gsi/web/guides/display-button)