> ## Documentation Index
> Fetch the complete documentation index at: https://docs.magic.link/llms.txt
> Use this file to discover all available pages before exploring further.
# Custom Email Provider
export const GrowthPlanCallout = () => {
return
This feature requires a subscription to Growth plan.
;
};
## Overview
Custom Email Provider is a premium feature that allows developers to configure the sender of login emails by routing emails through their own SMTP servers. Emails sent from our servers come from the default `noreply@trymagic.com`.
Enabling a custom SMTP gives you full control over where your application's login emails are sent from, as well as the name of the sender. Custom email providers are configured at the application level by visiting the Settings section of the [Dashboard](https://dashboard.magic.link).
## Configuration
Once Custom Email Provider has been unlocked for your workspace, you can configure your own custom SMTP server.
Currently, only the Microsoft provider is supported for OAuth authentication.
Refer to your SMTP provider to determine whether to use Basic Auth or OAuth.
### Basic Auth
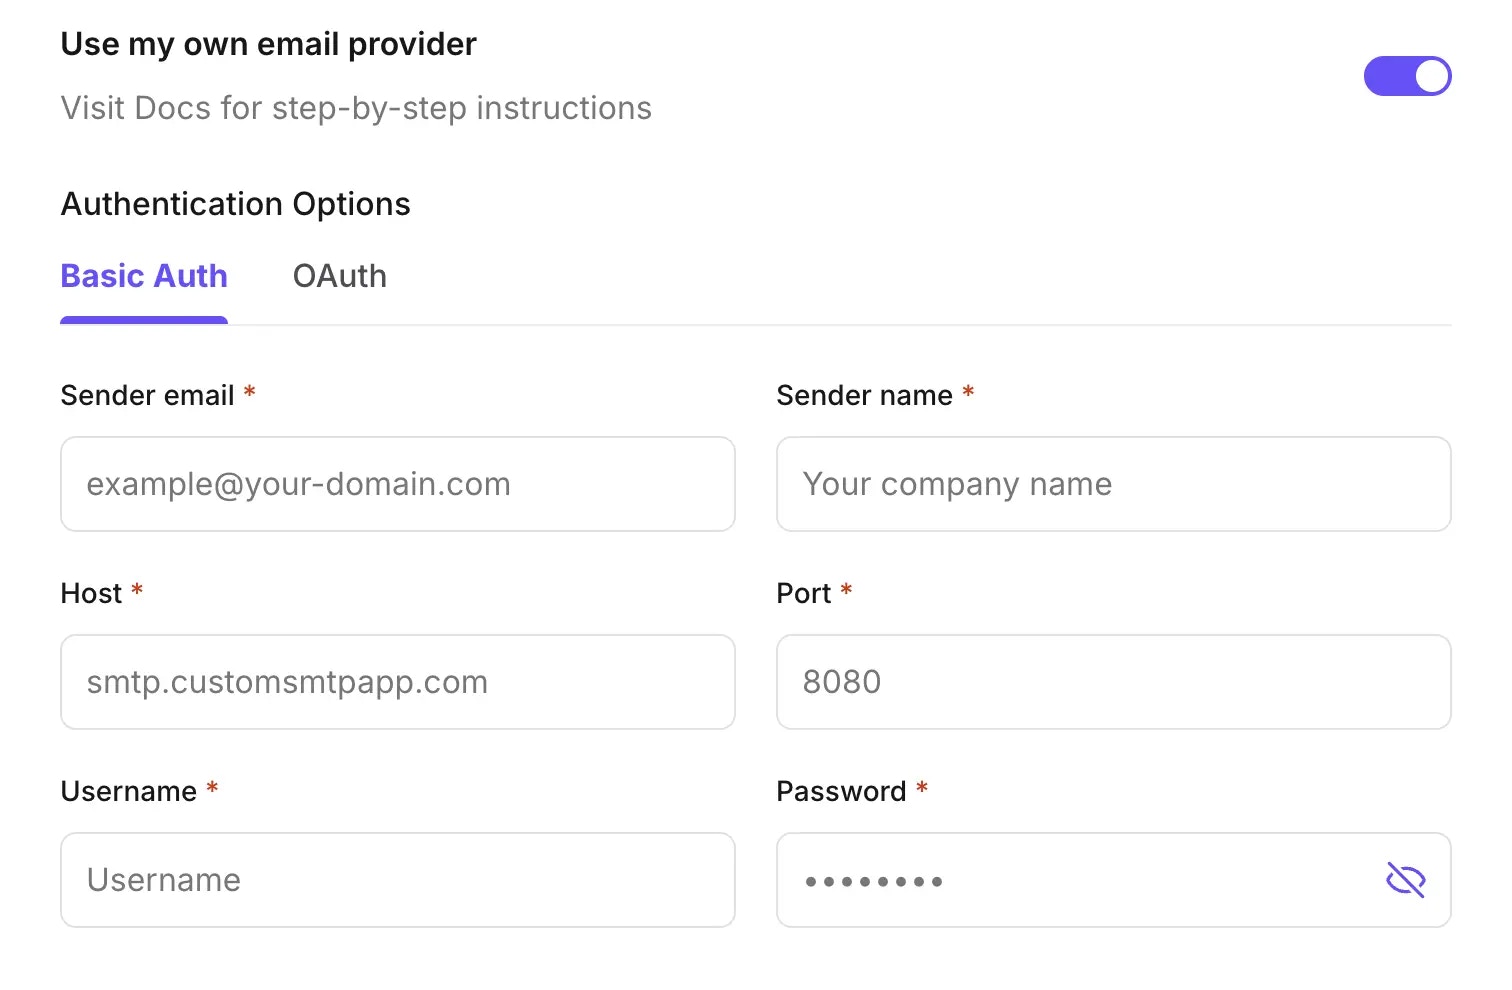 * **Sender email**: The email address your app's login emails will be sent from. E.g. `example@your-domain.com`
* **Note:** Do **not** to use your dashboard user account email as the `Sender Email`, or try to login with the `Sender Email`
* **Sender name (optional)**: The name that appears on the subject line of the login email. Defaults to sender email address if not provided.
* **Host**: Hostname for your SMTP server. E.g. `smtp.postmarkapp.com`
* **Port**: Port of your SMTP server
* **Username, Password**: Credentials to authenticate into your SMTP server
### OAuth
* **Sender email**: The email address your app's login emails will be sent from. E.g. `example@your-domain.com`
* **Note:** Do **not** to use your dashboard user account email as the `Sender Email`, or try to login with the `Sender Email`
* **Sender name (optional)**: The name that appears on the subject line of the login email. Defaults to sender email address if not provided.
* **Host**: Hostname for your SMTP server. E.g. `smtp.postmarkapp.com`
* **Port**: Port of your SMTP server
* **Username, Password**: Credentials to authenticate into your SMTP server
### OAuth
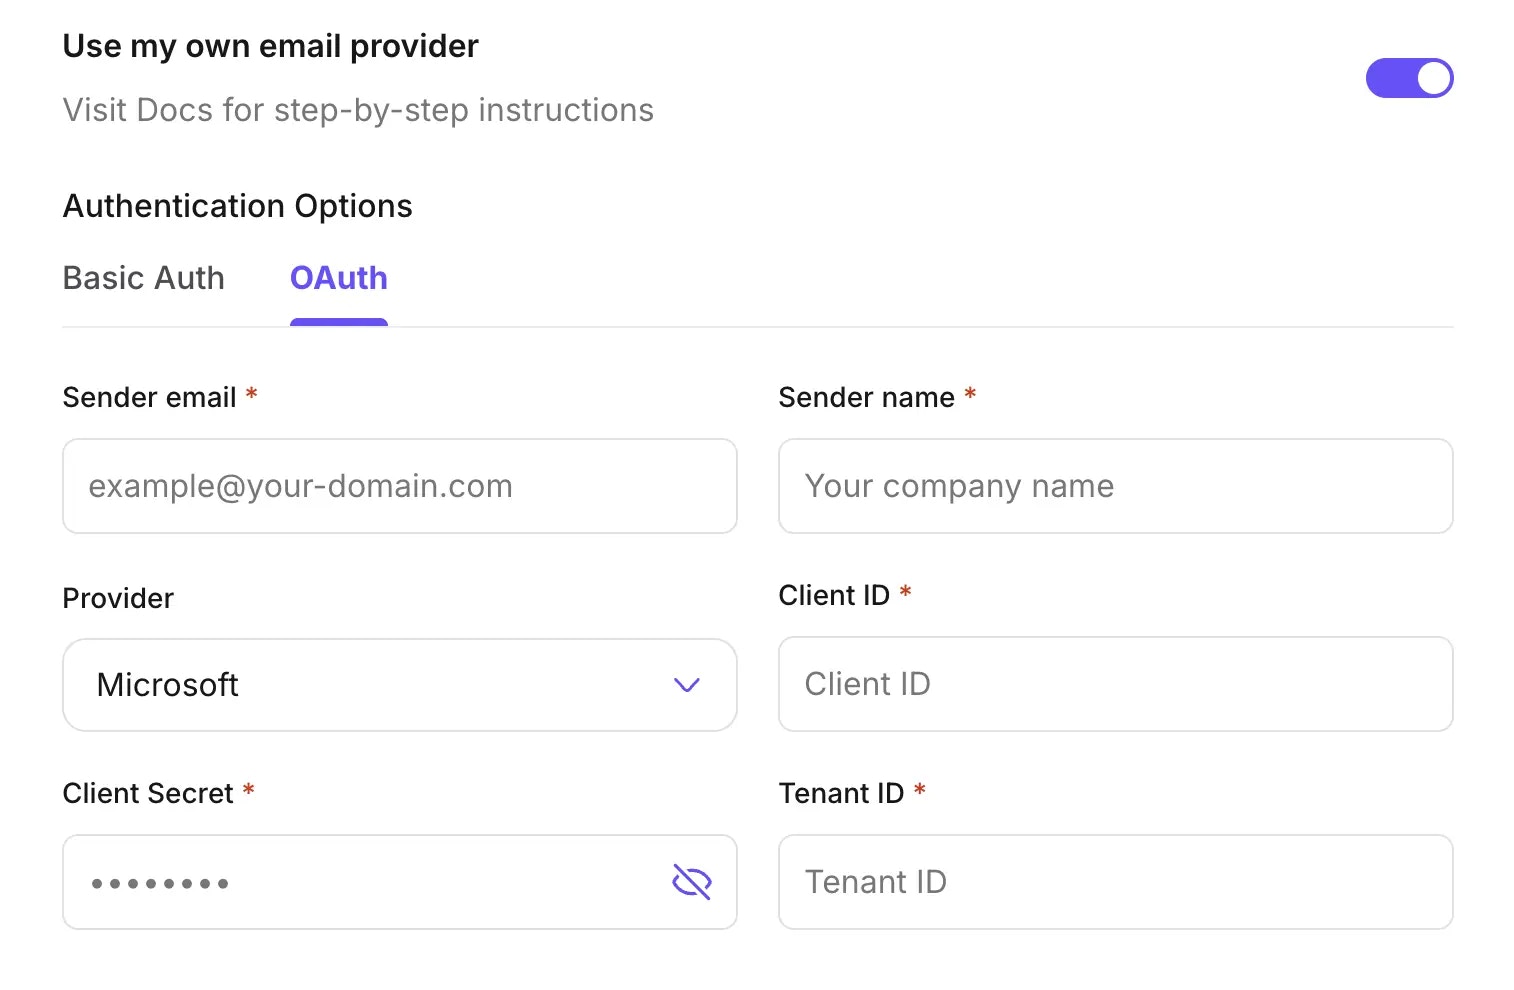 * **Sender email**: The email address your app's login emails will be sent from. E.g. `example@your-domain.com`
* **Note:** Do **not** to use your dashboard user account email as the `Sender Email`, or try to login with the `Sender Email`
* **Sender name (optional)**: The name that appears on the subject line of the login email. Defaults to sender email address if not provided.
* **Provider**: OAuth Provider. E.g. `Microsoft`
* **Client ID**: The Client ID of your provider’s OAuth App
* **Client Secret**: The Client Secret of your provider’s OAuth App
* **Tenant ID**: Your Microsoft Tenant ID
* **Note:** This field is required because, currently, only the `Microsoft` provider is supported
### How to Set Up the Microsoft OAuth Provider
You need an Office 365 subscription to use Microsoft SMTP Server.
1. Log in to the Microsoft Azure portal
* Use your organization credentials to access the [Microsoft Azure registration portal](https://learn.microsoft.com/en-us/azure). Refer to the official Microsoft documentation for more details.
2. Register a new application
* Provide an application name
* Select the supported account type
* Enter the redirect URL (optional)
* Click **Register**
3. Copy the Client ID
4. Create a Client Secret
* In Microsoft Azure, go to **Manage -> Certificates & secrets**
* Click **New client secret**
* Provide a **description** and set an **expiration period**
* Select **Add**
* Copy the **Secret** value
5. Enable the `SMTP.SendAsApp` permission
* In Microsoft Azure, go to **Manage -> API Permissions**
* Select **Add a permission**
* Choose the *APIs my organization uses* tile
* Select **Office 365 Exchange Online**
* Choose **Application permissions**
* In the *Select permissions* field, search for *SMTP.SendAsApp*
* Check the box for *SMTP.SendAsApp*
* Click **Add permissions**
* Select **Grant admin consent for ``**, then click **Yes** to confirm
6. Register service principals in Microsoft Exchange using PowerShell
* Run the following commands
```powershell PowerShell theme={null}
Install-Module -Name ExchangeOnlineManagement
Import-module ExchangeOnlineManagement
Connect-ExchangeOnline -Organization
```
For more information, see [Authenticate SMTP connection using OAuth](https://learn.microsoft.com/en-us/exchange/client-developer/legacy-protocols/how-to-authenticate-an-imap-pop-smtp-application-by-using-oauth)
* Register the service principal of a Microsoft Entra ID application by running the following command
```powershell PowerShell theme={null}
New-ServicePrincipal -AppId -ObjectId
```
**Important**: To obtain the `YOUR_APPLICATION_ID` value, navigate to **Overview -> Managed applications** in local directory and copy the Object ID.
## Send a Test Email
The **Send test email** button will be enabled after saving a valid custom SMTP configuration. It will attempt to send a test email from the specified custom SMTP configuration to the email of the Magic Dashboard user who is currently logged in.
If you do not receive your test email within 1-2 minutes, please check your configuration settings and try again.
If you run into any issues during setup, please reach out via our help widget in the bottom-right corner of this page.
* **Sender email**: The email address your app's login emails will be sent from. E.g. `example@your-domain.com`
* **Note:** Do **not** to use your dashboard user account email as the `Sender Email`, or try to login with the `Sender Email`
* **Sender name (optional)**: The name that appears on the subject line of the login email. Defaults to sender email address if not provided.
* **Provider**: OAuth Provider. E.g. `Microsoft`
* **Client ID**: The Client ID of your provider’s OAuth App
* **Client Secret**: The Client Secret of your provider’s OAuth App
* **Tenant ID**: Your Microsoft Tenant ID
* **Note:** This field is required because, currently, only the `Microsoft` provider is supported
### How to Set Up the Microsoft OAuth Provider
You need an Office 365 subscription to use Microsoft SMTP Server.
1. Log in to the Microsoft Azure portal
* Use your organization credentials to access the [Microsoft Azure registration portal](https://learn.microsoft.com/en-us/azure). Refer to the official Microsoft documentation for more details.
2. Register a new application
* Provide an application name
* Select the supported account type
* Enter the redirect URL (optional)
* Click **Register**
3. Copy the Client ID
4. Create a Client Secret
* In Microsoft Azure, go to **Manage -> Certificates & secrets**
* Click **New client secret**
* Provide a **description** and set an **expiration period**
* Select **Add**
* Copy the **Secret** value
5. Enable the `SMTP.SendAsApp` permission
* In Microsoft Azure, go to **Manage -> API Permissions**
* Select **Add a permission**
* Choose the *APIs my organization uses* tile
* Select **Office 365 Exchange Online**
* Choose **Application permissions**
* In the *Select permissions* field, search for *SMTP.SendAsApp*
* Check the box for *SMTP.SendAsApp*
* Click **Add permissions**
* Select **Grant admin consent for ``**, then click **Yes** to confirm
6. Register service principals in Microsoft Exchange using PowerShell
* Run the following commands
```powershell PowerShell theme={null}
Install-Module -Name ExchangeOnlineManagement
Import-module ExchangeOnlineManagement
Connect-ExchangeOnline -Organization
```
For more information, see [Authenticate SMTP connection using OAuth](https://learn.microsoft.com/en-us/exchange/client-developer/legacy-protocols/how-to-authenticate-an-imap-pop-smtp-application-by-using-oauth)
* Register the service principal of a Microsoft Entra ID application by running the following command
```powershell PowerShell theme={null}
New-ServicePrincipal -AppId -ObjectId
```
**Important**: To obtain the `YOUR_APPLICATION_ID` value, navigate to **Overview -> Managed applications** in local directory and copy the Object ID.
## Send a Test Email
The **Send test email** button will be enabled after saving a valid custom SMTP configuration. It will attempt to send a test email from the specified custom SMTP configuration to the email of the Magic Dashboard user who is currently logged in.
If you do not receive your test email within 1-2 minutes, please check your configuration settings and try again.
If you run into any issues during setup, please reach out via our help widget in the bottom-right corner of this page.